As shown in the Quick-Start Learning Path video "Start from a Scanned Drawing", there are several commands that will both speed drawing and improve accuracy. While there are many tips and tricks to working in CAD, this topic overviews the key skills you will find useful if you are drawing interior gross areas and room boundaries.
You will find these key commands for drawing accurately on the Quick-Start Process Navigator menu for the Extension for AutoCAD. If you sign into the Extension for AutoCAD as a quick-start user (e.g. as AFMSTART or AISTART), this menu will appear on the left-hand side of your drawing area.
When you use thew New Drawing command from an ARCHIBUS menu, the ARCHIBUS New Drawing dialog ensures that you properly register the drawing as metric or Imperial. However, you may with to use the Units command to set the scale in which the AutoCAD status line and commands display units information.
For Imperial drawings:
In Imperial drawings, one AutoCAD "unit" of distance is 1" for all drawings. For metric drawings, one AutoCAD "unit" of distance (that is, what AutoCAD chooses to consider a whole number) changes between M, cm, and mm based on country.
For Metric Drawings:

Most lines within a plan are rectilinear. As such, you may wish to constrain your point selection to purely horizontal or purely vertical lines. To do so:

For facility management or lifecycle management drawings, you typically need a 6" or 10 cm accuracy. In some less common cases, in which your areas are used for cost chargeback calculations that are subject to audit, you will need a 1" or 2 cm accuracy.
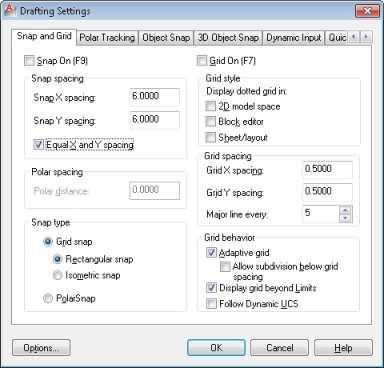
You can speed your drafting by setting a snap grid to this smallest required accuracy. The snap grid makes certain that each line or polyline you draw begins or ends on this grid. For instance, if you set a 6"x 6" snap grid, all points you draw will "snap" to that grid. This setting makes it easy to begin and end lines -- such as the polylines for adjacent rooms -- from exactly the same point.

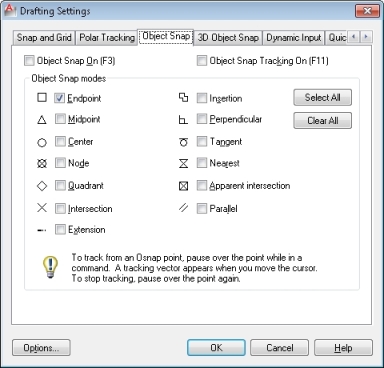
In some cases, you will want to start the next point -- such as the beginning corner of an adjacent room -- from an existing point, such as the corner of the last room you drew. In this case, use the Object Snap command again, but use the Object Snap tab as pictured.
This dialog lets you turn on and off "snap modes" that will make your cursor snap to points on existing elements.
In some cases, you will want to draw your drawings to an industry standard, such as IFMA, BOMA or IPD depending on your industry and country. Some organizations adopt these standards for consistency.
While they differ in detail, as regards drawing, the essential difference in these standards is how they define the boundaries of interior rooms.

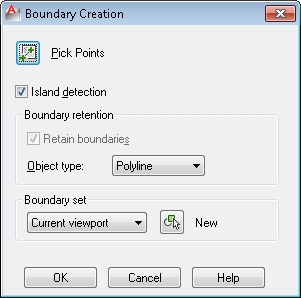
If you are drawing rooms to the face of walls, you can save a great deal of time by using the "BPOLY" command. This command can draw the boundary of an enclosed room in one step.
To use the command:
The command will create a separate, enclosed polyline for each room.