Open topic with navigation
Quick-Start / Space Console
Move Employees to the Wait List for Available Rooms (the Waiting Room)
You may have occasions when you know that employees need to move, but you are not certain of the rooms that they will move to. For example:
- New employees have been hired but storage space needs to be converted to offices to accommodate them.
- An employee needs to vacate an office before you assign the new hire to this room.
- You have several employees to place and you need to study three floor plans in order to determine the best occupancy plan.
- A division is reorganizing and several people are changing positions and departments. You want to clear all the current room assignments and then start with an empty floor plan and place all the employees according to their new departments and positions.
For cases such as these, you can use the Waiting Room feature. With the Waiting Room, you can place employees in a holding area, and when you determine the rooms that they should occupy, move them from the holding area to their rooms.
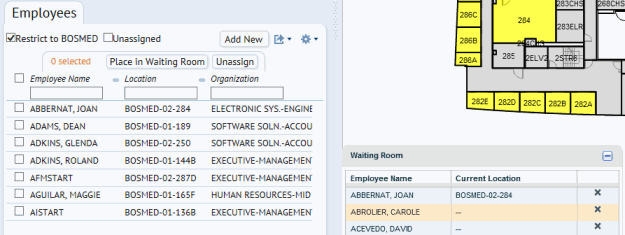
Note that when employees are listed in the Waiting Room, ARCHIBUS retains their employee record as is in the Employees tab. Once you move an employee from the Waiting Room and commit the changes, ARCHIBUS updates the Employees grid. For example, in the below image, you can see that Joan Abbernat has been placed in the Waiting Room and that her record still exists in the Employees tab.
The Waiting Room stays in effect as you change filters and review different employees. This behavior enables you to make multiple queries and place several employees in the Waiting Room at one time. For example, in the below image, the user first restricted to Unassigned employees and added to the Waiting Room two employees that have no room assignment. Next, the user restricted to building BOSMED and added Joan Abbernat to the Waiting Room.

Place Employes in the Waiting Room
- Load the Space Console, and select Occupancy mode.
- In the Employees tab, select the check boxes of the employees you wish to move to the waiting room.
- At the top of the Employees tab, ARCHIBUS reports on how many employees you have selected.
- When satisfied with the selection set, select the Move To Waiting Room button.
- ARCHIBUS displays these employees, and their current room assignment (if any), in the Waiting Room box, located to the right of the Employees tab.
- Note that the original Employee information remains in the Employees tab.
Move an Employee from the Waiting Room to a Room
- Open the floor plan containing the rooms to which you want to move employees.
- Place employees in the Waiting Room, as described above.
- In the Waiting Room, select the employee that you wish to move. You can select only one employee at a time.
- Drag the employee to the floor plan and release the mouse when you reach the destination room.
- You can mouse over the room to see the employees already occupying this room.
- If you choose a room that is already at capacity or that is over capacity, the system will warn you and ask if you want to proceed. If you choose to continue, ARCHIBUS will place the employee in the desired room.
- ARCHIBUS adds the employee to the list of pending assignments.
- At any time, you can review the pending assignments by choosing the View Pending Assignments button.
- ARCHIBUS presents a form listing the employees' current location and the location to which you will assign these employees.
- To remove an employee from the list, select it and choose the Cancel Assignments button. ARCHIBUS removes this item from the list.
- When satisfied with the list of employees to assign to rooms, choose Commit Assignments from the form. ARCHIBUS updates the drawing and the employee list, per step 10.
- If you choose not to review the Pending Assignments, select the Commit button located above the floor plan.
- If you have highlighted by occupancy status or displayed the employee name as a label, ARCHIBUS updates the drawing to reflect the new occupancy status or the new employee label.
- In the Employees tab, ARCHIBUS updates the employee's Location column with the new room assignments.
Remove Employees from the Waiting Room
- Place employees in the Waiting Room as described above.
- Click the "X" button for any employee that you want to remove from the Waiting Room.
Close the Waiting Room
As you load different floor plans and change the restriction filter while you are in Occupancy mode, the Waiting Room will remain active and you can continue to place employees in the Waiting Room and move them to rooms. The Waiting Room remains active with its list of employees until you leave Occupancy mode or leave the Space Console view. If employees have been placed in the Waiting Room and you attempt to switch to Space mode, ARCHIBUS warns you that the placement of the employees in the Waiting Room will be lost.

