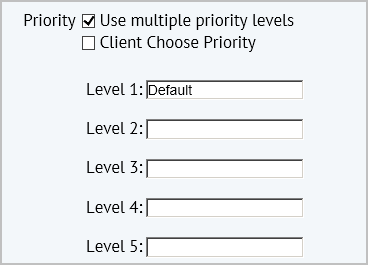
The form expands to show additional fields for priorities:
When you define multiple priorities, you will define different workflows for each of them in the next step in which you define the workflow.
The Step 2 - Workflow step appears.
Optionally, a request can have a priority level, such as High, Medium, Low, Emergency, or Non-Emergency.
For each priority level, you can assign a unique set of response procedures. Thus, similar requests that vary in priority level can have entirely different responses, with different service providers, different approval routings, and so forth. For example, the SLA governing an installation request with a priority of Urgent can define a different workflow than does an SLA for a an installation request with a priority of 1-Week.
There are a few ways to set up priority levels:
For example, suppose two priorities ("urgent" and "1 week") are defined, "1 week" is the default priority, and the SLA is defined to route all service requests to a business manager for Edit and Approval. Suppose the business manager reviews a request and wants it immediately handled. In this case, the business manager can change the priority level to Urgent to activate the corresponding response procedure.
To set this up, you would select the Use multiple priority levels check box, but leave the Client Choose Priority box unselected.
You define priorities as part of Step 1 - Request accessed by clicking Add New SLA, and then selecting Edit Details from the quick action pop-up form that appears. By default, the SLA does not have priorities.
To specify priorities:
The form expands to show additional fields for priorities:
When you define multiple priorities, you will define different workflows for each of them in the next step in which you define the workflow.
The Step 2 - Workflow step appears.