Open topic with navigation
Space Planning & Management / Space Inventory & Performance / Room Inventory (Non-Transactional)
Space Planning & Management / Space Inventory & Performance / Room Inventory - Set Up & Manage (Transactional)
Assigning Room Attributes Using Room Plans
If your site has CAD drawings depicting your room plans, you can edit room data and assign properties to rooms by locating the room on the floor plan and editing its data. Users familiar with the physical location of a room may find this a convenient way to edit room information. It is also often helpful to graphically see the location of rooms when making assignments. For example, you may wish to have all rooms of the same department located contiguous to each other. You can more easily see this relationship on a graphical floor plan drawing than you can in an alphanumeric listing.
So that you can edit data in this manner, the Room Inventory processes provide the following tasks:
- Assign Divisions and Departments to Rooms
- Assign Room Categories and Types to Rooms
- Assign Room Standards to Rooms
This set of tasks provide an alternative method for entering room inventory data. For information on entering basic room inventory data, see Define Rooms.
Note: If you have access to the Space Manager tasks, you can perform all of the above edits from the Assign Room Attributes and Occupancy task. See Assigning Room Attributes Using Room Plans (Space Manager).
To work with these tasks, follow this basic procedure.
- On the Process Navigator, choose the appropriate task under one of these processes:
- Space Inventory & Performance/Set Up & Manage (Transactional method)
- Space Inventory & Performance/Room Inventory (Non-Transactional method)
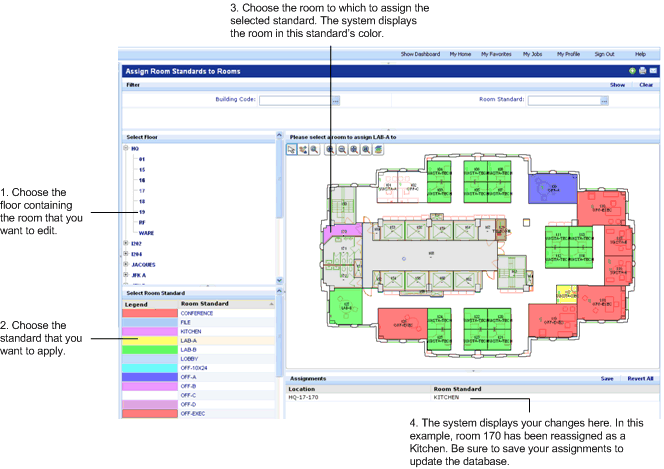
- The system presents a filter console, drill-down tree for selecting the floor plan, and depending on the task that you selected, a panel of room standards, room types, or departments.
- If you have several records to drill through, you may wish to use the filter at the top of the view. The filter limits the drill-down frames to showing just the data that you indicate in the filter. For example, if you want the drill-down frames to present only floors in the HQ building, set the Building Code to HQ in the filter console.
- Select the floor whose rooms you wish to edit. The drill-down frame presents only those floors for which CAD drawings have been developed.
- Once you select the floor, the system presents its drawing in the right pane. For the selected task, the drawing's rooms are highlighted according to the colors of the records.
- For example, if you choose the "Assign Room Standards to Rooms" task, the drawing highlights the rooms according to the colors of the assigned room standard values.
- For a listing of the values that each color represents, consult the records in the lower left frame.You can also mouse over a room to learn its assignment.
- If your desired value does not have an associated color, you need to first set this in the appropriate table. For example, if your desired department is not associated with a color, load the Background Data/Define Division and Department Highlight Colors task to set a color for this department.
- To assign a property to a room, select the property in the lower left frame; for example, select the Room Standard value CONF.
- In the drawing, click on the room to which you want to assign the CONF room standard.
- The system redisplays the room in the color associated with the selected value, in this case, the CONF value. In the lower right frame, Assignments, the program lists the assignments that you make with this task. Note that the text labeling the room (the asset text) is not updated until you actually save the change.
- Continue making your changes and the system will redisplay the rooms in the appropriate highlight color and list your changes in the Assignments frame.
- Save your changes by choosing Save in the Assignments frame.
- At this point, the assignments are changed in the database and the labeling asset text is updated.
- If you have workspace transactions for any of the edited rooms, the system automatically applies the new room attribute property to the dependent Workspace Transaction records.
- To cancel all your assignments, choose Revert All.
- If you like, you can see your changes in an alphanumeric format by loading the Define Rooms task.
Note: Be aware that editing a room's assignments from the Web may require that you catalog the drawing in the CAD environment in order to update the asset text with changes made in Web Central. For example, suppose you change a room’s division and department assignment in Web Central. When you click Save, the program assigns the room to a new division and department, and updates the ARCHIBUS database accordingly. In Web Central, the highlight pattern for the Flash drawing changes to that of the new department or division, as do the room labels. However, when you view this drawing in CAD, if the drawing displays the division and department as asset text, you will see that the drawing displays the previous values. In the Smart Client Extension for AutoCAD or in the DWG Editor, simply run the Catalog command to synch the asset text to the assignments made in Web Central.