Open topic with navigation
ARCHIBUS Quick Start / Space
Space Planning & Management / Space Inventory & Performance / Room Inventory (Non-Transactional)
Space Planning & Management / Space Inventory & Performance / Room Inventory - Set Up & Manage (Transactional)
Space Planning & Management / Space Inventory & Performance / Background Data
Real Estate Portfolio Management / Lease Administration / Background Data
Defining Highlight Patterns and Hatch Patterns in Bulk
When defining room standards, departments, room categories, room types, and leases, you can associate each record with a highlight so that you can highlight rooms on floor plan drawings by their assigned elements. For example, you may want to highlight rooms on a floor plan drawing according to their department assignment. To define the highlight, you complete the Highlight Pattern - Acad field, as described in Defining Highlight Patterns.
To facilitate the definition of highlight patterns, ARCHIBUS offers the following tasks for defining highlight patterns in bulk:
Division and Department
- ARCHIBUS Quick Start / Space / Define Division and Department Highlight Patterns
- Space Inventory & Performance / Background Data / Define Division and Department Highlight Patterns
Room Standard
- Space Inventory & Performance / Room Inventory Set Up & Manage / Define Room Standard Highlight Patterns (Transactional)
- Space Inventory & Performance / Room Inventory / Define Room Standard Highlight Patterns (Non-Transactional)
Room Category and Room Type
- ARCHIBUS Quick Start / Space / Define Room Category and Type Highlight Patterns
- Space Inventory & Performance / Room Inventory / Define Room Category and Type Highlight Patterns (Non-Transactional)
- Space Inventory & Performance / Room Inventory Set Up & Manage / Define Room Category and Type Highlight (Transactional)
Lease
- Real Estate Portfolio Management / Lease Administration / Background Data / Define Lease Highlight Patterns
These tasks operate similarly, and provide the following advantages over individually editing a highlight pattern field:
- Show a swatch of the highlight.
- Present multiple records, so that you can see the highlights that have already been assigned.
- Provide tasks for automatically generating highlight patterns.
- Provide tasks for generating highlight patterns in terms of hierarchical relationships.
The Create Highlight Pattern Views
The views for creating hatches have a set of buttons for editing and generating highlight patterns and swatches showing the highlight patterns, For information on the types of highlight patterns (solids, hatch patterns and gradients), see Defining Highlight Patterns.
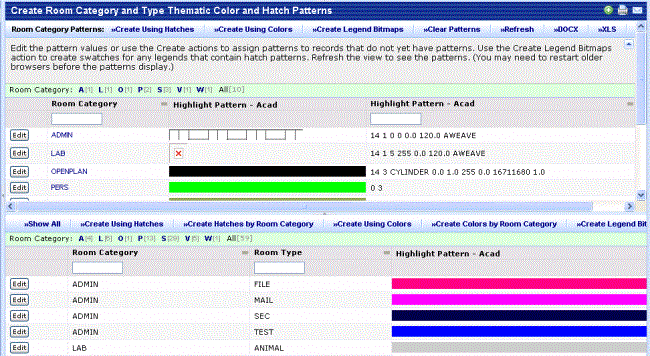
The view includes a swatch of the defined highlight pattern.
- If an item does not yet have a highlight pattern, its swatch appears as gray. See LAB-ANIMAL room type in below image.
- If an item has a hatch pattern for which a swatch needs to be generated, the swatch field is empty. See the LAB room category in the below image.
- If the highlight pattern is defined to be a gradient, the dialog displays black. It cannot display the gradient sample as gradients are for paginated reports only. See OPENPLAN in below image.

To enter a highlight pattern for an individual record
Follow these steps to create a solid fill, highlight, or gradient pattern for an individual record. Note that gradient patterns must be entered using this method.
- Choose the record's Edit button and complete the Set Highlight Pattern dialog box, as described in Defining Highlight Patterns.
- If your highlight is a hatch pattern, generate a swatch as described below.
To automatically generate a solid fill or hatch pattern
For records without highlight patterns, you can have the system automatically generate a solid fill or hatch pattern:
- Choose the Create Using Hatches or Create Using Colors button.
- If your highlight is a solid fill, the system will display a sample swatch in the grid.
- If your highlight is a hatch pattern, generate a swatch as described below.
To generate hatch patterns in terms of a hierarchy
You may want to combine colors and hatch patterns to show a hierarchical relationship, with all records of the same owner having unique hatch patterns but using the same color. For example, all departments within the same division can have the same color, but each department can have a unique hatch pattern.
- (Optional) You may wish to clear all highlight pattern values so that the system will generate values for all records.
- Choose the Create Hatches by Room Category or Create Hatches by Division button.
- Generate a swatch as described below.
To generate a sample swatch of a hatch pattern
Visually seeing your highlight patterns helps you to avoid assigning the same or very similar patterns to the different records.When you choose a solid color, the system immediately generates a swatch of this highlight and displays it in the grid. However, hatch patterns require that you explicitly generate the swatch.
To generate swatches for all hatch patterns that do not have bitmaps:
- Choose the Create Legend Bitmaps button, located at the top of the view.
- Choose the Refresh button, located in the top right corner of the view. (You may need to scroll to see it.)
- The system displays the hatch patterns. (If you have an older browser, you may need to exit the view and then reload it in order for the hatch patterns to display.)
Note: : If you will be highlighting by a value in queries that use , do not choose a hatch pattern as your highlight pattern. Border highlights do not support hatch patterns.

