Open topic with navigation
Space Planning & Management / Space Inventory & Performance / Space Manager / Assign Room Attributes and Occupancy task (Transactional)
Space Planning & Management / Space Personnel & Occupancy/ Space Manager / Assign Room Attributes and Occupancy task (Transactional)
Sharing Rooms
As a space manager, you may need to share a room--that is, share the physical space between multiple employees or share the time that each employees uses the room. You may do so with the Assign Room Attributes and Occupancy task.
For background on how the system uses records to share rooms, see:
Note: You can also share rooms by right clicking on a room when using the Space Planning Console.
To select a room from the drawing and share it
- In the Process Navigator, choose the Assign Room Attributes and Occupancy task.
- The system presents a filter console, and a drill-down tree for selecting the floor plan.
- If you have several records to drill through, you may wish to use the filter at the top of the view. The filter limits the drill-down frames to showing just the data that you indicate in the filter.
- For example, if you want the drill-down frames to present only floors in the HQ building, set the Building Code to HQ in the filter console.
- Select the floor whose rooms you wish to share. The drill-down frame presents only those floors for which CAD drawings have been developed.
- Once you select the floor, the system presents its drawing in the right pane.
- Right-click on a room and choose Share Room from the pop-up menu.
- The resulting Workspace Transaction form displays information for this room. Edit these values as necessary.
- For example, if the room has one Workspace Transaction record whose Percentage of Space value is currently set to 100 percent, and you want to share this room, you can use the Add New Workspace Transaction button on the left to create a new Workspace Transaction record to define how the other 50 percent of space is used. The system will then update the original record (set at 100 percent) to 50 percent.
- The Define Workspace Transaction form that the system presents when you choose the "Share Room" option from the drawing, is completely documented in the Define Workspace Transactions task of the Room Inventory - Set Up & Manage process. You can follow the instructions in this topic, with the exception that you will have chosen the room to share from the drawing, rather than from a drill-down pane.
To share any room, not just those on the current drawing
As described above, to use this task, you select a room, right-click to access the pop-up menu, choose Share Room, and receive a form with a filter restricted to the selected room. However, if you clear the values in the filter, you can create workspace transaction records for any room, not just the room selected in the drawing.
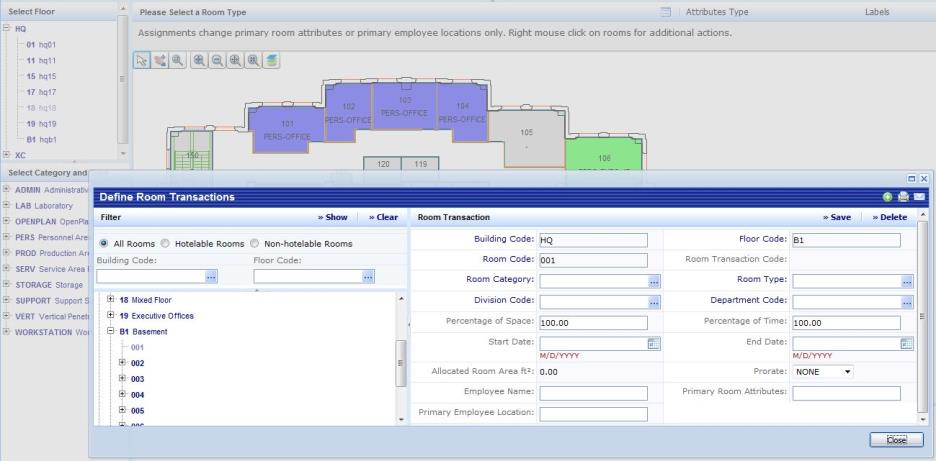
After you select a room from the drawing and the system displays a form for defining workspace transactions, you must display the filter by clicking on the small triangle button at the left of the frame. For example, in the below image, the user selected a room from floor plan HQ18, chose Share Room from the right-click menu, displayed the filter in the Define Workspace Transactions frame, and cleared the filter. The user can now access any Workspace Transaction record, and create new Workspace Transaction records for any room. In this case, the image shows creating Workspace Transaction records for HQ-B1-001.
For information on working with the Define Workspace Transactions form, see Define Workspace Transactions.
The specific steps to follow are:
- In the Process Navigator, choose the Assign Room Attributes and Occupancy task.
- The system presents a filter console, and a drill-down tree for selecting the floor plan. In this case, you can display any floor plan, as the floor plan is the vehicle for accessing the form for all rooms.
- Once you select the floor, the system presents its drawing in the right pane.
- Right-click on a room and choose Share Room from the pop-up menu.
- The system displays the Define Workspace Transactions form.
- Use the resize button on the left of the form (small triangle button) to display the filter in the left frame. Choose the Clear button.
- If you wish, you can maximize the Define Workspace Transactions form.
- Use the hierarchy tree in the left frame to drill down to the room that you want to share. Create Workspace Transaction records as appropriate.
- When you have finished your edits, save each record.