From some views, you can access a document associated with the data you are viewing. For example, the Leases table has a Lease Contract field which can hold the file name of the lease contract, which is a Word document. From an edit form in ARCHIBUS Web Central, you can use the document management features to launch Microsoft Word to view this document. Depending on your permissions, you may also be able to check out this file for editing, check in your changes, delete the file, and lock and unlock it.
In some cases, where multiple documents can be uploaded and attached to a single record, you click the Add New button and then use the Add Document dialog box to upload a document.
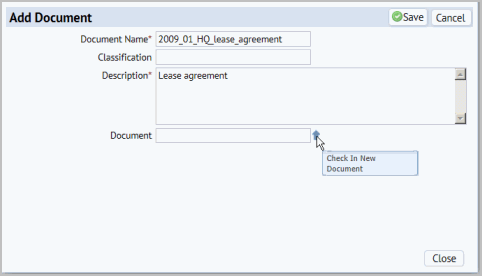
With the Add Document dialog box, you fill out the Document Name and Description, and save the document record before the system gives you the option to upload the document by showing the Check In New Document button next to the Document field.

Fields that can launch associated documents have a series of buttons,
such as:

You can mouse over a button to see a tooltip that describes its function.
There are several ways to view a document:


You must first save the record before you can add a document. After saving the record, the Document field has the Check In New Document button.
Select the Check In New Document button (it is the only button available), as shown below.

The system prompts you to browse and select the file to check in. The system completes the field value with the original file name and stores it in the document vault by naming it according to the structured convention (such as, ls-001-lease_contract.doc).
You can choose to enter a comment about this document, and also set the lock status. Typically, you will want to unlock the document so that others can check it out.
Before you can check in a document, you must save other changes to the record. This ensures that the document is always filed correctly, and associated with the correct record.
Sometimes you may have several documents that you want to import at one time. For example, if you are working with the MSDS application, you might have 1000+ MSDS sheets currently on file that you need to load into the ARCHIBUS document system. For information, see Importing Documents in Bulk to the Document Management System.
If you want to edit a file, you must check it out. Click on the Check Out Document button. Web Central prompts you for a local folder in which to place the document, and automatically names the file according to its data relationships.
For instance, if you extract a document associated with the Lease Contract field of Lease 001, the program names the document after the table name (ls), document field name (lease_contract), and primary key value (001), such as ls-001-lease_contract.doc.
You can access the Check Out Document button only if you have edit security permissions. If the document is locked, you cannot check it out.
Once you have finished editing a document, you need to check it in. Click on the Check In New Version button. The system prompts you to select the file to check in.
If the field supports multiple versions of a document, Web Central will store this version as a separate file instead of overwriting the current version.
Before you can check in a document, you must save other changes to the record. This ensures that the document is always filed correctly, and associated with the correct record.
The goal of locking documents is to prevent two or more people from editing the same document at the same time, which results in two or more different branches of changes. Typically, you lock documents as part of the check out procedure and unlock documents when you check them in.
However, in some circumstances you may need to change the lock status separately from the check-in and check-out processes. In these cases, use the Lock Document and Unlock Document buttons.
Use the Delete Document button to remove the field's reference to the document. Web Central clears the file name value from the document field.