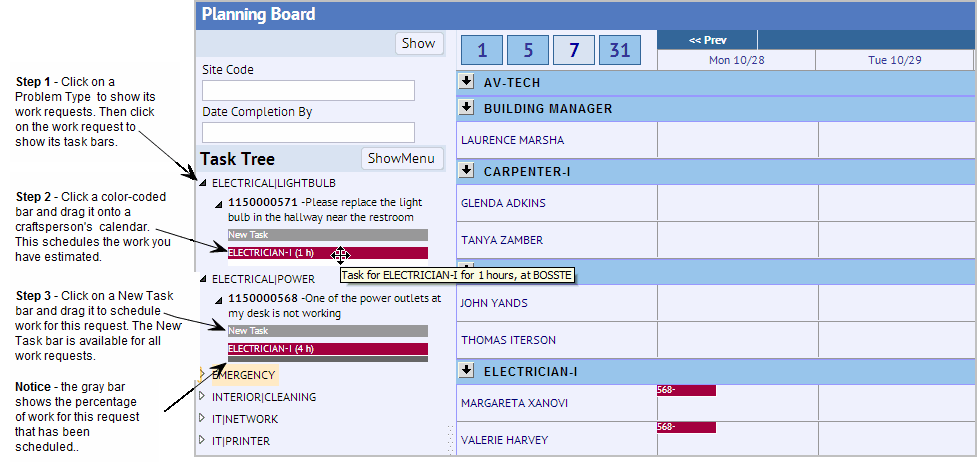
The Planning Board provides a graphical interface for planning work and scheduling craftspersons. Using the Planning Board, you drag and drop tasks for work requests onto a calendar that shows all your craftsperson. This enables you to schedule work while viewing the planned hours that each craftsperson will spend on jobs, giving you the information you need to schedule for maximum efficiency.
You can also schedule craftspersons using the Schedule action available from the Building Operations Console; schedules that you make with the Schedule action also appear on the Planning Board. See Add and Schedule Craftspersons.
The below image outlines the organization of the Planning Board. The numbers in the text refer to the corresponding labels in the image.
To schedule work, you drag and drop a trade estimation from the hierarchical tree on the left onto a craftsperson's date cell on the planning board. For more information, see Scheduling Using the Planning Board.

The calendar can be displayed for the current day, work week (5 days), week (7 days), or month. By default, it shows a week.
You select the calendar you want to see by clicking the buttons at the top of the calendar showing trades and craftsperson.

The list of craftspersons is organized by trade.
Craftspersons are shown in an accordion style list; click the arrow next to a trade to see or hide the list of craftspersons for that trade.
Click on a craftsperson in the list to see a pop-up window with the craftsperson's details and all work requests assignments.This enables you to see the craftspersons assignments beyond the dates shown in the calendar.
Select the work request in the Task Tree, click ShowMenu at the top of the Task Tree, and select Show info from the submenu. The Work Request Information window shows details for the work request.
To find a work request's tasks on the calendar, select the work request in the Task Tree, click ShowMenu at the top of the Task Tree, and select Highlight Entries. The system will highlight all tasks for this work request on the calendar and gray out all other tasks. Note that if there are no highlights, this might be because the task is scheduled during a different time frame than the calendar shows.Change the calendar display to show a different time period.
Examine the highlights to be sure that the work will be done in the appropriate manner; for example, if three tasks are required for the job, is one task scheduled to occur several days later, delaying the completion of the entire job? Similarly, are the two separate trades scheduled for the exact same time? Should they be rescheduled so that one follows the other?
Cancel the highlight by clicking ShowMenu, and then selecting Clear Highlights.
When you expand the Problem Type in the Task Tree, and then click on the work request, the New Task bar appears.
There are two situation in which you would use the New Task bar:
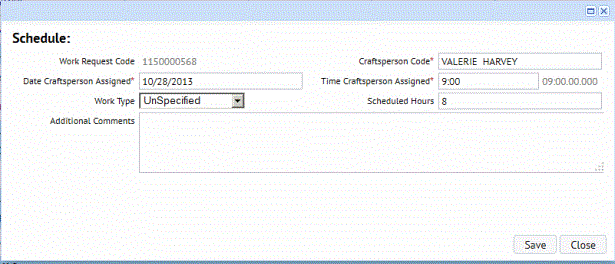
You can add a new task for a work request by locating the work request in the Task Tree and dragging the New Task bar onto a craftsperson's calendar. When you drop the task onto the calendar, you can enter the task details in the Schedule form that automatically appears.

The system will update the work request in the Task Tree by listing this new task.
Note: It is not necessary that you first estimate your labor requirements before scheduling craftspersons. You can schedule a craftsperson for a work request that has not been estimated by dragging and dropping the New Task bar onto a craftsperson's calendar and defining work details with the dialog that the system presents.
You schedule a task by dragging from the left side of the screen a trade estimate for a work request (such as an estimate for a Painter to work for 3 hours) and dropping it onto a craftsperson calendar for a specific date. When you drop the task, the system does the following:

As with the Scheduling task, you are not limited to scheduling craftspersons of only the trade that you have estimated. For example, if you have estimated that you need three hours of work by a Junior Carpenter, you can drag this requirement to any trade, not just the Junior Carpenter trade. This feature allows for maximum flexibility in scheduling. However, you should be careful not to schedule too far off from your estimated labor. For example, you might want to use this feature to schedule a Senior Carpenter craftsperson for work that you estimated as Junior Carpenter work.
Note: When scheduling a craftsperson, you specify the start time and scheduled hours; for example, you might enter a start time of 10:00 for a 2-hour job. However, the system does not prevent you from scheduling this craftsperson again during this time. For example, the system would permit you to schedule the craftsperson for another job between 10:00 and 12:00 for this same day. This allows for multitasking when appropriate. You can update the system with the craftsperson's actual hours worked on the job. See Updating Actual Craftsperson Hours.
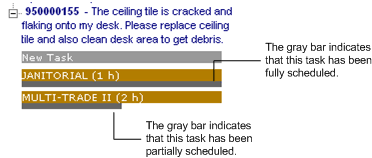
Note: If you drop a job onto the craftsperson's calendar (the gray bar is 100%), the system permits you to still place this job on another craftsperson's calendar. In this case, when you drop the job onto the calendar, the system will automatically default the scheduled hours to 8 hours, which you can then edit.
When scheduling work, examine the existing blocks on each craftsperson's calendar to maximize craftsperson time. For example, if a painter is scheduled to work 5 hours on a task and you have a 1-hour painting task to schedule, add this 1-hour job to the same day as the 5-hour job. You can review the location and other details of the job to be sure that these jobs will logistically make sense for the craftsperson by selecting the task in the tree, clicking ShowMenu, and selecting Show Info from the menu..
With the graphical interface of the planning board, you can quickly see craftspersons who are under-scheduled. By simply dragging and dropping tasks between craftspersons, you can fill up a craftsperson's day with tasks and avoid unfilled blocks of time.
You will find that you may need to split a task between multiple craftspersons, or have a craftsperson work on the task for multiple days. For example, suppose a painting task will take 8 hours. You can drag the task onto a craftsperson's calendar. You can then right-click on the task, choose Split, and the system will convert this 8-hour block into two 4-hour blocks. You can now assign the two 4-hour blocks to two craftspersons. Or, you may wish to right-click on the new 4-hour block to create two 2-hour blocks and divide the task between more painters.
Similarly, you might want one painter to split an 8-hour job over two days. Drag the estimate onto a calendar, right-click on the task, choose Split, and the system converts this 8-hour block into two 4-hour blocks. You can now assign one of the two 4-hour blocks to another day.
Note: When scheduling jobs that are estimated to take several days, you will want to set the display of the calendar to 7 or 31 days, because the system schedules only for the displayed dates on the calendar. For example, if the calendar is set to display five days, and you want to schedule a 60-hour job, the system will schedule as much of the 60 hours as it can on the visible five days. The gray bar at the bottom of the task will indicate the percentage of the job that you have scheduled. To schedule the entire 60 hours in one step, you should set the calendar to display 31 days.
The planning board consults the craftsperson working hours to verify that the schedule meets these conditions.
The system checks the number of hours that a craftsperson is available a day and generates blocks accordingly. For example, if a craftsperson is available 8 hours a day and the work request includes an estimate of 12 hours for the specified trade to complete this job, the system will generate two blocks for this job: one for 8 hours and one for 4 hours. You can then drag the 4-hour block onto the appropriate day.
Note: You can override warnings for a craftsperson's standard available hours.
You can make these changes to the schedule: