As the Compliance Manager, you need to upload important compliance documents for regulations, programs, requirements, locations, and events. Additionally, you might need to upload generic compliance documents that are not associated with a specific record. For example, you might have general procedures, best practices, audit checklists, and compliance vendor documents that apply to more than one compliance record. To enable you to upload, find, and view all of these documents most efficiently, the Manage Document Library task offers a consolidated method for managing all documents in one place.
Your Business Process Owner for Compliance can define the document folders and subfolders. You can then associate documents with these folders when working with regulations, compliance programs, requirements, or events. See Adding Document for Compliance Records.
From the Manage Document Library view, you can drill-down in the list of folders and subfolders to locate the document. From this drill-down list, you can manage all document associated with a Document Folder.
The Document pane includes documents added for compliance records (regulations, compliance programs, requirements, events, or locations), whether or not these documents are associated with a Document Folder. You can use the Filter console to locate any document. The filter you enter restricts both the drill-down list and the documents shown in the Document pane. For example, if you enter a Document Category and Type in the Filter, both the drill-down list and the Document pane include only documents have that Document Category and Type.
From the Manage Document Library task, you can:
The Manage Document Library task includes a Filter console that you can use to restrict the view to facilitate locating the document you want to work with. If you have associated a document with a Document Folder, with a Document Category, Document Type, or with a specific compliance record, you can use the Filter to locate documents using any of these criteria.
For example, you can restrict by Regulation, Compliance Program Code, Requirement Code, Document Folder, Document Category or Type, or Document Author.
The restriction you enter is applied to both the documents shown in the hierarchical tree in the Document Folders pane, and to the documents shown in the Documents pane. The Documents pane shows all documents meeting the restriction you set in both the Filter console and the Document Folders pane. You set restrictions in the Document Folders pane by selecting folders and clicking Show.
Note the following when setting a restriction:
From the "Show Documents For" list, you can select All, Regulations, Programs, Requirements, Events. These selections apply the following additional filters to the panel:
All: None
Regulations: The document is associated with a regulation and not with a program.
Programs: The document is associated with a program, and not with a requirement.
Requirements The document is associated with a requirement.
Events: The document is associated with an event. An event is generated from a requirement and is a record in the Action Items table with an Activity Type of COMPLIANCE - EVENT.
When you select a child folder, the parent folder is automatically selected.If children and subchildren are automatically selected when parent is selected, and 2. If parent is automatically selected when all direct children are selected.
You can select folders from the Document Folders pane to locate documents by the Document Folder they are associated with. You select the check box for the folder, and click Show to show documents in that folder. If there is a restriction set in the Filter console, that entry plus the Document Folder selections are used to restrict the view to show specific documents.
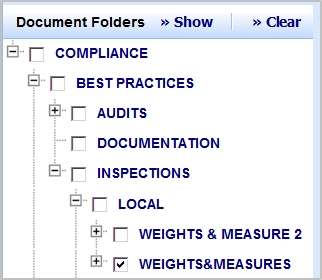
When a folder has more than one subfolder, you can select just one of the subfolders, as shown in the following screen shot:
When a folder has a single subfolder, all the folders in the path must be selected, as shown in the following screen shot. That is, you cannot select the LOCAL folder without also selecting the WEIGHTS & MEASURES and SUBFOLDER folders.
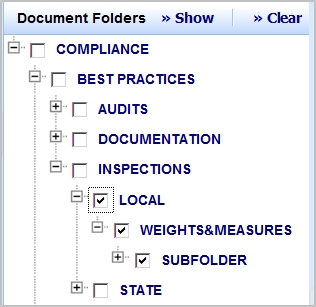
If you want to search for documents only in the WEIGHTS & MEASURES folder, you can enter WEIGHTS & MEASURES in the Folder field in the Filter console, and click Search. The Documents pane will now show only documents in that folder, and not show documents in the SUBFOLDER folder.
To view documents:
Depending on the type of document, you might be prompted to select whether to open the document or to save it.
The document opens for your review.
You can edit information for the document and can check in a new version if needed.
To edit document information:
The Define Compliance Document Form appears.
To facilitate locating documents, you can add a compliance document to a Document Folder that your Business Process Owner has defined. You can also assign a Document Category and Type to the document to facilitate locating it. Additionally, you can associate the document with a specific compliance regulation, program, requirement, event, or location.
To add compliance documents:
The Define Document tab becomes active.
Document Name: Enter a name that identifies the document.
Description: Enter text that identifies the document to users.
Document Category/Document Type Select a document category and type to describe this document. If you select a category and type for the document, these can be entered as search criteria to help you quickly locate the document. Your Business Process Owner defines the categories and types from which you choose. Document Folder Select a folder for the document so that you can search for it by folder, or locate it by drilling down in a selection list of folders and subfolders. Using Document Folders is especially useful for generic documents, such as best practices, that are not associated with a single record, and that might even be used across applications. However, you can associate any document, even those associated with a specific record, with a Document Folder to facilitate locating it.
Once you drill down to a folder and select it, the field displays the last folder in the path; it does not display the entire folder hierarchy.
Your Business Process Owner defines the folder structure.
Document Author Enter the name of the person who wrote the document, or the name of the organization that published the document.
Date Document Enter the date the document was published or written, or another critical date. For example, when adding documents using the Compliance Management application, you could enter the invoice date, bill date, or the issued date for a permit or license when adding a document. For EH&S, critical dates might be the training date, or the issued date for personal protective equipment. When users search for documents using the Date Document From and Date Document To fields, the application selects records for the restriction based on the document's Date Document.
Document Review Group
Select the security group that is allowed to view this document. If you leave this field empty, any user who has access to this task can view the document. Document Notes
Enter any additional notes that describe how this document is used. For example, enter a document abstract, or enter a custom tag that you define to make locating this document easier by entering this tag in the Document Notes field in a Filter console.
Regulation To associate the document with a specific regulation, select the regulation from the list. Compliance Program Code To associate the document with a specific compliance program, select the program from the list. When you select a compliance program, its regulation is automatically filled in. Requirement Code To associate the document with a specific requirement, select the requirement from the list. When you select a requirement, its program and regulation are automatically filled in. Location ID To associate the document with a specific compliance location, select the location from the list.
If you have already selected a regulation, compliance program, requirement, or an event, the Location ID field shows only the locations defined for the selected item. To add a different location, use the fields in the bottom section of the form. If you make a selection that you need to change, you can click the Clear button to clear all the fields in the bottom form.
When you select a Location ID, the location values are copied to fields in the bottom section of the form.
Event ID To associate the document with an event, click the Select Value button in the Event ID field and select the event. If needed, use the Smart Search Console to restrict the list of events. See Restricting Data Using the Smart Search Feature.
If you have already selected a regulation, compliance program, or a requirement, the Event ID field shows only the events for the selected item.
When you select an event, the Regulation, Compliance Program, and Requirement for the event are automatically filled in, and those fields are disabled.
To change the selection, click Clear. You can now select a different event, or a regulation, program or requirement.

Click this button to access the dialog to locate and select the document. After selecting the document, click OK in the dialog. See Working with the Document Management System for more information.
After you select the document and click OK in the dialog, the document is stored in the ARCHIBUS document management system, and it is associated with the regulation, compliance program, requirement, event, or location you selected.
See Also