It is often useful to see rooms in a floor plan highlighted by various properties. Being able to visually see the room on the floor plan, its access to other features of the floor, its adjacent rooms, and so forth, can help you make better decisions about how you use these rooms, the departments occupying these rooms, and so forth. For example, a list of rooms assigned to a department may not be as valuable as highlighting these rooms on a floor plan so that you can see if a department's rooms are all located near one another which can lead to more person-to-person contact and productivity within a department.
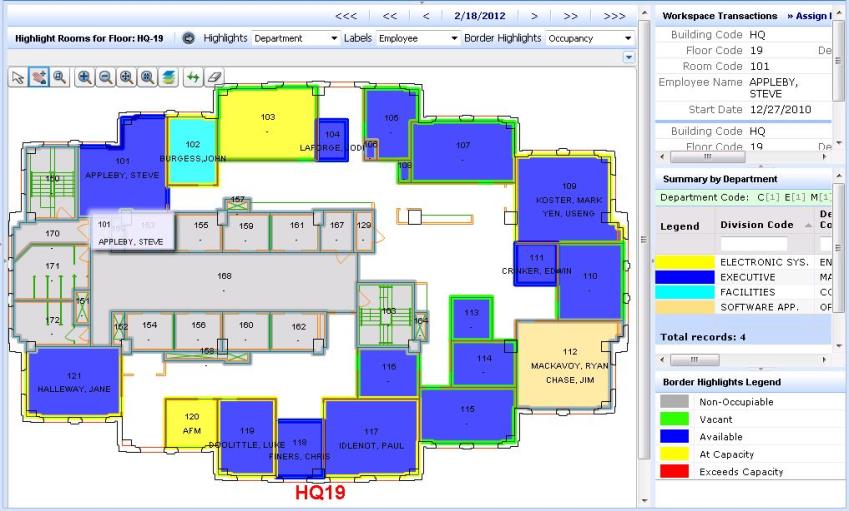
With the Space Planning Console task, you can highlight rooms by two properties at once. One highlight is by filling the inside of the room with the appropriate color for the value, and the other highlight is by outlining the border of the room with the appropriate color for the value. For example, the below image shows a floor plan highlighted by department (fill highlight color) and occupancy (border highlight color). For room 103, you can see that it is assigned to the Electronic Sys.- Engineering department (yellow fill) and is vacant (green border highlight).
Note that the system shows the details of the properties in the right grids, with the top right grid showing information about the main highlight and the lower right grid showing information about the border highlight.
Prerequisite: Load the Space Planning Console task and adjust the display as described in Space Planning Console.
In the Highlights option, choose the attribute by which the program will highlight rooms by filling them. You can choose the basic attributes of a room (room category, room type, division or department using the room, or room standard). You can also select:
If you wish to highlight by a secondary property, choose a property for the Border Highlights option. For the property that you select, the system will outline the border of rooms according to the colors of the associated values. The same values are available as with the Highlights option.
Tip: When determining occupancy, the Space Planning Console considers approved space requests only; it does not consider requested move requests. Therefore, when reviewing your floor plan, you may wish to set the Border Highlight to Pending Requests so that you can see rooms that may change when pending move requests are approved.
In addition to the room number that is listed in each room, you may want to include other labeling text. For example, if you are highlighting by category, you may want to display the room category value in each room so that you immediately know this value without consulting the grid.
You may need to zoom into the drawing in order to see the labels displayed. However, without zooming you can always hover over a room to display the information chosen for the label.
You can also display a label that is unrelated to your highlights. For example, you could display the employee as a label, highlight by department, and border highlight by occupancy to easily see three important facts about each room. This example is shown in the above image.
To display a label, simply choose it from the Labels option. Note that for the employee label, the system displays the employee who is using the room whether or not the room is the employee’s primary location.
To hide all text, including room number, choose None for Labels.
By default, the system displays data for today's date and lists this date in the display. Use the buttons to move the date by Previous Year, Previous Month, Previous Week, Next Week, Next Month, or Next Year. As you choose the various buttons, the system will display the corresponding date and update the drawing and the grids to reflect the conditions on this date.

Regardless of the highlights that you are displaying, you can always access the Workspace Transaction records for a particular room. Hover over the room, and in the top right panel, the system displays the Workspace Transaction records active for the specified date for this room. If there are multiple records, you can scroll through the list. You can also resize the Workspace Transactions panel to see multiple transactions at once.
In the pane beneath the Workspace Transaction Records pane, the system shows the legend for the attribute by which you are highlighting, areas for each value, and the count of value. Totals and counts for occupancy and room standard are based on values in the Room records; all other totals and counts are based on the values of the Workspace Transaction records.
If you choose to highlight by pending request, the right pane will list the pending requests for your review.
Note: The Pending Requests pane show all requests that start on or after the current date. Thus, if you see a completed request in this panel it is because you requested and completed a request on the current date. After the current date passes, this request will not show
If you choose to produce a border highlight, the system shows the border legend in the bottom right pane. Use the legend to understand the values associated with each border highlight color.
Note that unlike the main highlight, the system does not count and total the data for the various values by which you are border highlighting.
If your border highlight is for pending requests, the system shows the pending requests in this pane.
There are a few issues to note about the highlighting features.
Pending Requests -- The system determines rooms that have pending requests by this formula:
WHERE rmpct.activity_log_id IS NOT NULL AND (rmpct.status = 0 OR (rmpct.status = 1 AND rmpct.date_start >= <date in filter console> AND rmpct.date_end IS NULL))