Open topic with navigation
Quick-Start / Space Console
Highlight Rooms in your Floor Plan by Two Properties
Sometimes you may need to see multiple properties on your floor plans at one time. For example, you may want to see each department's vacant rooms, In this case you can highlight by occupancy and by department. To do so, you set two highlights:
- a solid-fill highlight for department (set the Highlight option to solid fills the room by each department's color)
- a border highlight for occupancy (set the Border option to outlines the border of the room with the color for the occupancy status)
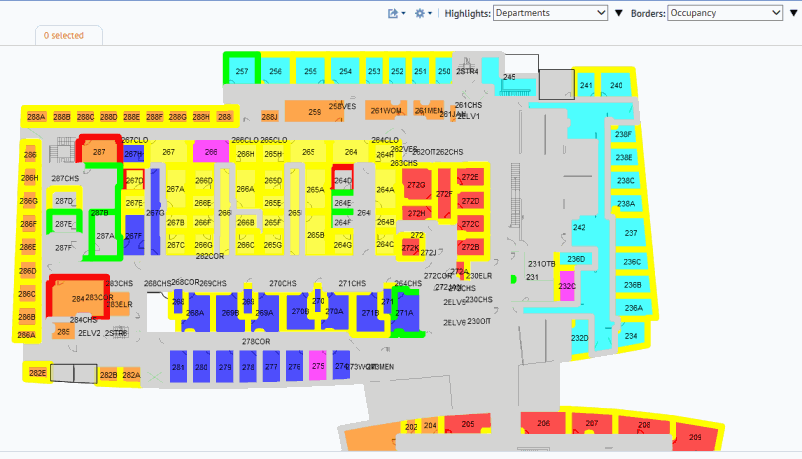
For example, the below image shows a floor plan highlighted by department and occupancy status. This lets you easily see availability for each department. Each room is solid-filled with a color associated with the department, and a second color (the border highlight) outlines the boundary of each room. For example, room 257 (top row on the left) is filled with aqua to indicate that it belongs to the Human Resources-Mid Atlantic department and its boundary is outlined in green to indicate that the room is currently vacant.

Showing Legends for the Highlight and Border Colors
To determine the value that each color represents, click the triangles next to the Highlights and Borders options. The system displays a legend listing each value and its associated color. You can move this legend to anywhere on the screen.

Procedure
- Load the Space Console and choose Space mode.
- The middle section of the Space Console lists the floor plan drawings.
- Click the selection boxes for the drawings you wish to load.
- Set the property for which you want a solid fill highlight. In the Highlights option in the floor plan ribbon, choose the desired property. The system solid-fills rooms according to the colors associated with this property. Areas without colors do not have a value for this property.
- To determine the value that each solid-fill highlight color represents, click the triangle next to the Highlights option. The system displays a legend listing each value and its associated color.
- Set the property for which you want a border highlight. In the Border option in the floor plan ribbon, choose the desired property. The system outlines rooms according to the colors associated with this property. Areas without colors do not have a value for this property.
- To determine the value that each border highlight color represents, click the triangle next to the Border option. The system displays a legend listing each value and its associated color. You can move this legend to anywhere on the screen.
Hints


