Open topic with navigation
Building Operations / Preventive Maintenance / Maintenance Manager
Defining PM Schedules
After you define your general PM procedures and assign these procedures to locations and equipment, you, as maintenance manager, must set the schedule, such as weekly, daily, or monthly, for executing the procedure on each specific equipment item or location. By defining
the
interval at which to perform this work, you enable the ARCHIBUS system to use a scheduling routine to automatically generate work orders for all upcoming work due within a period that you specify.
Note: For a discussion of the concepts involved in scheduling and more information on the fields presented by this form, see Understanding the Scheduling Options. For details on the exact calculations run by the scheduling routine, see Understanding the Scheduling Routine.
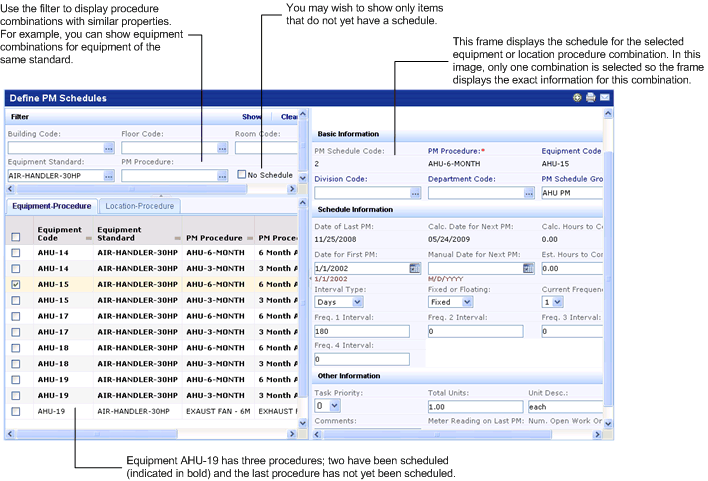
To define PM schedules, run the "Define PM Schedules" task, which presents a list of equipment and locations with their assigned procedures in the left frame. Since locations and equipment can have multiple assigned procedures, the system lists the unique equipment-procedure and location-procedure combinations. For example, if equipment item AHU15 has two assigned procedures, you will see AHU15 listed twice in the list, once with each assigned procedure.
Note the use of bold font in the equipment-procedure and location-procedure combination lists:
- If a combination does not yet have a schedule, the system displays it in regular font. Select it, and the right frame presents options for setting the schedule.
- Combinations listed in bold already have schedules. Select one of these items, and its schedule displays in the right frame, as in the below image. (Selecting multiple procedure combinations is discussed later in this topic.)

Working with Multiple Items and Schedules
You may wish to enter the same schedule information for a group of related equipment-procedure or location-procedure combinations. For example, for all equipment of a particular equipment standard, you may wish to assign the same schedule for a procedure for checking the air filter.
To edit, view, or assign schedules to multiple procedure combinations, follow these steps.
- (Optional) You may wish to first filter your list of items so that you can see related items, which will likely use the same schedule. For example, you might want to apply the same schedule to all equipment or rooms located on the same floor, all equipment that has the same assigned procedure, and so forth.Or, if you have a series of new items for which you need to schedule maintenance, you might wish to set the No Schedule option to see only items that do not yet have schedules.
- (Optional) Once your items are displayed, you may wish to order them so that certain items are next to each other and easy to locate. For example, in the above image, items were filtered by equipment standard and then sorted by equipment code so that equipment-procedure combinations for the same equipment items were listed next to each other.
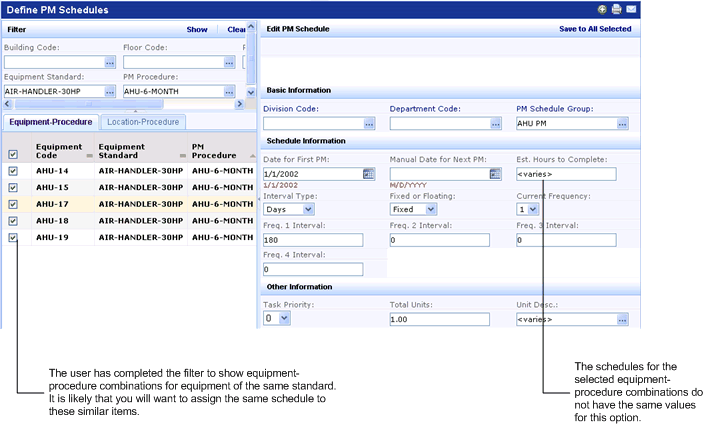
- For the items whose procedures you wish to schedule, select their check boxes in the left frame, or use the check box in the header to select all displayed items (as per below image).
- In the right frame, the system displays information about the schedules of the selected items.
- If you are establishing a new schedule, complete the scheduling options in the right frame and this schedule will be applied to all selected procedure combinations.
- If you are reviewing existing schedules, the system displays the schedule information common to the selected procedure combinations. If the values are not the same, the system displays <varies>. Often, you will want the same schedule for a set of items, so you may want to investigate any value with <varies>. For example, in the below image it is likely that the schedules for the selected procedure combinations should have the same estimated hours to complete and unit description. Therefore, you may wish to determine the schedules whose values do not match and adjust them.
- If you need to edit a value, enter your change and select the "Save to All Selected" button. Your change will be applied to all procedure combinations that are selected (have checks in their check boxes).

Setting Basic Information
The top portion of the form lists the PM Procedure and its equipment and location and holds this basic information:
- Division/Dept -- Complete these fields, if you wish to associate this schedule with a division or department for the room or equipment being serviced. The system does not automatically complete these fields with the division and department to which the room or equipment item is assigned
- PM Schedule Group -- If you wish, specify a PM Schedule Group. If a set of PM schedules have the same scheduling group code and come due on the same day, you can assign these schedules to the same work order. See Defining PM Schedule Groups.
Entering Scheduling Information
The middle section of the form specifies the schedule.
Defining the Start Date and Schedule Format
Complete these fields to get started:
- Date for First PM -- Enter the date on which the job is to be first executed.
- Fixed or Floating -- This field, combined with the interval, determines how the system should generate the next due date. Choose if you want to use the Date for First PM as the starting date; select if you want to use the Date of Last PM as the starting date.
- Estimated Hours to Complete -- If you wish to enter an estimated time for completing this task, you can do so in this field.
This section of the form also displays this information:
- Date of Last PM -- The system automatically completes this field with the completion date of the last work request completed for this schedule.
- Calculated Date of Next PM -- When you run the scheduling routine, the system automatically completes this field with the next scheduled date of maintenance.
- Calculated Hours to Complete -- Based on the value for "Standard Units per Hour" for this procedure and the units for this particular equipment item or location, the scheduling routine calculates how long this task should take and displays the value in this field. See "Defining the Units" later in this topic for information.
Establishing the Frequency
Next you need to specify the frequency at which to execute the job.
You can provide multiple frequencies and then choose one to implement. This feature provides flexibility in scheduling by allowing you to provide different levels of maintenance according to the availability of resources or the season.
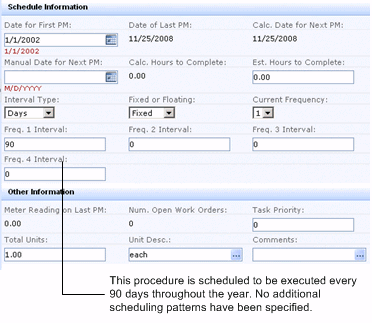
If you want to run a job on the same schedule throughout the year, set the frequency in the Frequency Interval 1 field and set Current Frequency to 1.

Complete these fields:
- Interval Type -- Complete with the interval measurement (hours, days, weeks, miles, and so forth) that will be applied to the below fields. Choose Meter if the schedule is to be assigned to an equipment item and you want to schedule maintenance according to the equipment's meter reading.
- Current Frequency -- Specifies the Frequency Interval that the scheduling routine currently uses to set the schedule. If you have only one frequency interval, this will always be set to 1.
- Frequency 1, 2, 3, 4 Interval -- If you wish to establish multiple frequency intervals, complete as many of these fields as necessary with the various intervals. If you have only one frequency interval for the entire year (such as executing a task every 10 days), enter "10" in the Frequency 1 Interval field.
Overwriting the Generated Dates
If you want to ignore the generated schedule dates, you have two options:
- Specify an Interval Type of Manual and then use the Define PM Schedule Date by PM Schedule task to define when the work should be performed.
- If you wish to temporarily stop a defined schedule, use the Manual Date for Next PM field to specify a date for performing the job; the scheduling routine will generate dates beginning with this date.
- The value for Manual Date for Next PM overrides any other scheduling information you may specify.
- For example, if you enter 12/02/09 in this field and specify a 10 day interval, the system will generate dates of 12/02/09, 12/12/09, 12/2209 for floating scheduling. For fixed scheduling, the 10 day interval is calculated from the Date of First PM, but is calculated only for dates after the Manual Date for Next PM.
Establishing Seasonal PM Tasks
Some PM jobs are dependent on the season; for example, you may need to fertilize trees and bushes once a month from May and through September, or you may want to change the oil in your lawn-mowing equipment once a month during this time period. One way to accomplish this is to set up five yearly schedules with start dates in May, June, July, August, and September for the same location-procedure or same equipment-procedure.
To do this, set up the first schedule for an equipment or location. Then, select this equipment-procedure or location-procedure item in the left pane and use the Copy button to create a new record. The system copies over the key information about the task, and you can adjust it to reflect the appropriate start date. For example, if the first record had a start date of May, you can set June as the start date for the copied record.
Completing Other Information
Defining the Units
Each procedure defines the unit measurement and number of units you can process in an hour, such as cleaning 300 square feet of carpet per hour. For each particular schedule, complete Total Units with the number of units required for this particular equipment item or room. For example, for a mopping or vacuuming task, set the Total Units equal to the square footage of the room; for a task of changing an equipment item's filter, set Total Units to 1.
Complete Unit Description with the same value as the procedure's Unit Description.
If you wish to enter a comment about this particular item's units, you can do so in the Comments field.
The system determines the Calculated Hours to Complete value using this calculation:
PM Schedules Total Units / PM Procedures Units per Hour
For example, if your carpet cleaning procedure calls for clean 300 square feet of carpet per hour, the routine would calculate a value of .33 hours (100/300) hours for cleaning the carpet of a 10x10 room.
Reviewing Other Information
The bottom section of the form displays the following information:
- Meter Reading on Last PM -- Generating a PM work order completes this field with the value of the Current Equipment Meter Reading field from the most recently completed work request performed for this PM schedule.
- Number of Open Work Orders -- Holds the number of open work orders to which this schedule is assigned
- Task Priority -- If you want a reminder of the importance of executing this task, complete this field with a number indicating the importance of executing this schedule.
Next
With the schedule defined, you can now have the system calculate the work due for a specified time period by running the Define PM Schedule Dates by PM Schedule task.
You can review all of your schedules by running the View PM Schedules task.
You can generate work orders for a specific time period by running the Generate PM Work Orders task.


