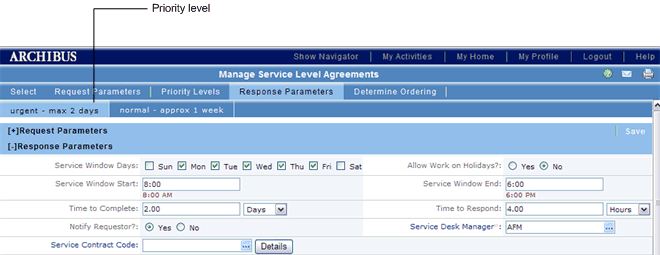
The next step in creating your SLA is to define the response procedures.
If you have set priority levels, you will define a response procedure for each priority level. The priority levels that you have defined will appear as a series of tabs beneath the first set of tabs. Select each priority level to define its response parameters.
If you have not set priorities, you will have one tab in the priority row: the Default tab. In this case, you define response procedures for the SLA as a whole, and not for each priority.

For a selected priority level or for the SLA as a whole, you now define basic information about the response, including the service window, the time to respond, and the time to complete the request.
Since SLAs are typically part of a service contract with an internal or external service provider, you can also specify the service contract from which the SLA derives. (The service contracts must have been previously entered into the system.) Choose a service contract from the Service Contract Code list. If you need a reminder of its details, select the Details button, which can show the vendor's name, expiration date, and a link to the actual contract document, if uploaded into the document management system by the Service Contract Manager.
If you want the requestor to receive notification about the request's status changes as it is routed through the system, set Notify Requestor? to Yes.
If the request type is not for SERVICE DESK-MAINTENANCE, you must specify the service provider to handle requests of this SLA.
Note: This section of the form does not appear for SLAs whose Request Type is SERVICE DESK-MAINTENANCE,
You can assign an External or Internal Service Provider by selecting the appropriate radio button and entering external vendor or internal service provider information. With these two options, the service request will automatically be directed to the assigned internal or external service provider for execution.
Some sites may wish to give the service provider the option of accepting or rejecting the job. This ensures that the service provider is truly able to handle the work.
To allow the service provider the option of declining the work, choose the "Assign Service Provider with Acceptance Step" option, which instructs the system to forward the request to a service provider for acceptance. If you set this option, in the Optional Workflow Steps panel (described below), you need to define an acceptance step . See Including an Acceptance Step for Approved Service Requests.
You may choose to notify by e-mail service provides assigned to executing this SLA by choosing the Notify Service Provider? option.The text of the email message is defined by the system integrator using the tasks of the System Integrator role
If you are defining an SLA for a Request Type of SERVICE
DESK-MAINTENANCE,you will have options for defining how the system generates a work request to handle the service request. See Setting Up On Demand Work Parameters.
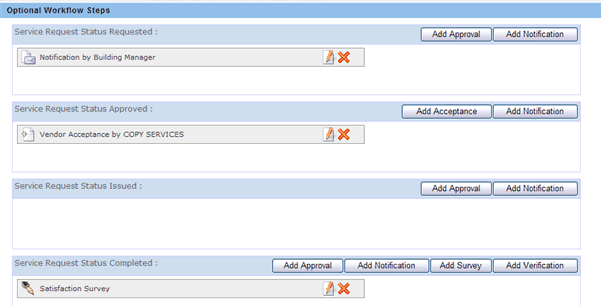
The bottom panel lists the possible service request statuses. For each request status, you can define one or more Notification, Approval, and Acceptance steps. For the Completed status, you can additionally define satisfaction surveys and verifications.
When defining these steps, you may have the choice to issue an email notification to the person responsible for completing a workflow step, such as the manager responsible for approving work. The exact text of the message is defined by the system integrator using the tasks of the System Integrator process.
Note: If you are defining an SLA for a Request Type of SERVICE
DESK-MAINTENANCE,you will have additional statuses for defining how the system handles work requests generated from service requests. See Setting Up On Demand Work Parameters.

With the buttons on the right, the following workflow steps can be created:
Including a Satisfaction Survey for Completed Service Requests
Back to Overview of Creating an SLA