To create the workflow using the SLA form, you can make the following selections from the form
Requested Status
Make the following selections for what should happen when the work has the Requested status.
- If needed, select the check box to require approval. See Adding an Approval Step.
- If you want the requestor of this work to receive email each time the request changes status, select Notify Requestor of all status changes check box. Otherwise, you can set notifications to occur for specific statuses only.
- Optionally, you can add the following steps for Requested work:
- Add Confirmations. These are approvals, or estimation and scheduling approvals that do not include the ability to edit the request. When you define these steps the system enforces them; that is, the work cannot move to the next status until the step is completed. See Adding a Confirmation Step for an SLA.
- Add Notification.
- Add Approval. Use this link to add another Edit and Approval step. See Adding an Approval Step for an SLA.
Approved Status
When a request is approved, it needs to be dispatched so that the work can be issued.
Make the following selections for what should happened once the work is approved:

- Auto Create Work Order: If you are using work orders to group your work requests, select this check box to automatically create a work order for this work.
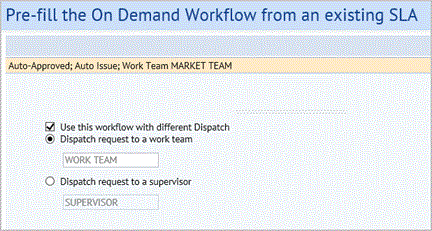
- Auto Issue: If you want to expedite work for this SLA, so that it is automatically issued, select this check box. In this case, you will need to specify a work team or a supervisor to whom the work will be issued.
- Dispatch request to a work team: To dispatch to a work team, select this option button, and type in the field. A list of work teams that match your typing appear. Select the work team from the list.
- Dispatch to a supervisor. To dispatch to a supervisor select this option button, and then type the supervisor in the field.
- Assign request to a dispatcher. (This option is not available if you are auto-issuing the work, or auto-creating the work order.) To assign the request to a dispatcher who will determine how it is assigned, select this option, and click the Add Dispatch Step link.
- Optionally, select the Craftsperson Code and enter the Default Duration for this work. This will automatically schedule the specified craftsperson for the work, and use the estimated number of hours as the estimate for the work.
Assigned to Work Order status:
Optionally, you can select the following steps for the work when it is assigned to a work order: Because these steps are defined in the SLA, they will be enforced: the work request will not progress until these steps have been completed.
Add Confirmation step - This is an estimation or schedule approval without the ability to edit. See Adding A confirmation Step for Work Requests.
Add Estimation step / Add Scheduling step - See Adding an Estimation or Scheduling Step for Work Requests,
Add Notification step
Issued Status
You can select the following steps for the work once it is issued:
Notify Craftsperson: Select this check box to send email notification to the assigned craftsperson when the work is issued.
Optional Notification step: Click this link to add a notification.
Rejected, Stopped, Cancelled
Optionally, you can define service desk steps for the work when it is rejected, stopped, or cancelled. See Manage Service Desk Steps.