Open topic with navigation
Quick-Start / Space Console
Exporting Highlighted and Labeled Floor Plans to Word or PDF
Once you highlight and label a floor plan, you may want to share it with others who do not have access to the ARCHIBUS system. For example, you may want to:
- share with department heads a floor plan highlighted by department so that you can discuss future space needs.
- print a floor plan labeled with the employees occupying each room (an occupancy plan) and post it in a common area so that employees can find their co-workers.
- share a floor plan highlighted by department and vacancy status to show department heads how they can better utilize their assigned space.
- print out a floor plan highlighted by room type and bring it to a meeting to discuss space renovations and reconfiguration.
To share floor plans with staff who do not have access to the ARCHIBUS system, you have two options:
- export the drawing to a Word document. You can then adjust it and print it from Word. This procedure is described below.
- run the Generate PDF of Floors in Location List command. This provides the added benefit of automatically including a legend of the highlight colors, but does not allow for both solid-fill and border highlights.
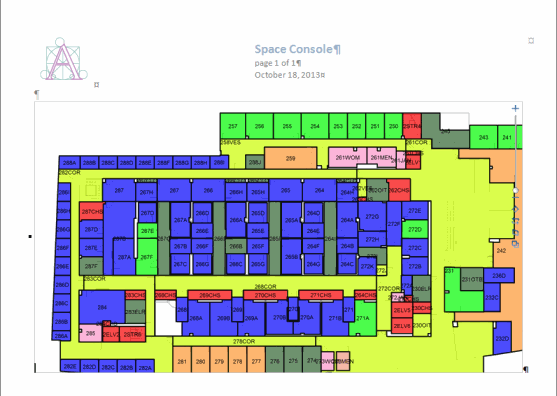
For example, the below image shows the floor plan exported to a Word document.

To export floor plans on the screen to Word
- Load the Space Console and choose the Space or Employees tab.
- The middle section of the Space Console lists the floor plan drawings.
- Click the selection box for the drawings you wish to load.
- If desired, adjust the zoom setting. ARCHIBUS will export these drawings at the current zoom setting and will present them as an image in the Word document.
- Use the Highlights and Border options to set the appropriate highlights. For details, see Highlight Rooms in your Floor Plan by One Property and Highlight Rooms in your Floor Plan by Two Properties.
- Use the Labels option to add the labeling text to the floor plan. For details, see Label the Rooms on the Floor Plan Drawing.
When you export the drawing, the system does not export the legend. Therefore, you may wish to match the label to one of your highlight options so that readers know the values that the colors represent. For example, if you are highlighting by Room Type, you might want to display Room Type as the label so that viewers can immediately see each room's assigned room type
- Click the Export button, located in the floor plan ribbon. Click "Export What You See to DOCX."

- ARCHIBUS exports the drawings on the screen with their current zoom, highlights, and labels as an image and places the image in a Word document.
- ARCHIBUS prompts you to open the Word document or save it.
- Once you open the Word document, you can resize the image of the floor plan. You might want to change the Word document to landscape mode and resize the image accordingly.
To generate a formatted report with highlights, labels, and legends
- Load the Space Console and choose the Space or Employees tab.
- Use the filter to display the list of floor plans that you want to include in the report. You do not need to select these floor plans or open them. All floor plans listed in the Location List will be included in the PDF.
- Use the Highlights option to set the desired highlight. For details, see Highlight Rooms in your Floor Plan by One Property. Note that ARCHIBUS cannot generate a report that includes border highlights.
- Use the Labels option to add the labeling text to the floor plan. For details, see Label the Rooms on the Floor Plan Drawing.
- Click the Export button, located in the floor plan ribbon. Click "Generate PDF of Floors in Location List."
- ARCHIBUS opens a new browser window and presents a status bar showing its progress in generating the report. When ARCHIBUS completes the report, you can open it by clicking the file name for the generated report.
- When you examine the report, you will see that it lists on each page a highlighted floor plan with labels and a legend of the highlight colors.
- You can save the generated PDF to your own descriptive name and location.


